组件 5 种通信方式
官网是这么介绍组件的:
组件允许我们将 UI 划分为独立的、可重用的部分,并且可以对每个部分进行单独的思考。

有时候我们发现写的代码文件太长,可读性太差了。这个文件包含了 a、b、c、d 四个模块。如果我们将 a、b、c 和 d 分别拆成 4 个文件,然后使用文件 e 来组合它们。这样,我们每个文件都不大,可读性打了很多。
第二个优势是,我们在 e 文件中可以多次使用这四个组件。例如,我们可以使用 a 组件三次,反正每个 a 组件的逻辑都是相同的。
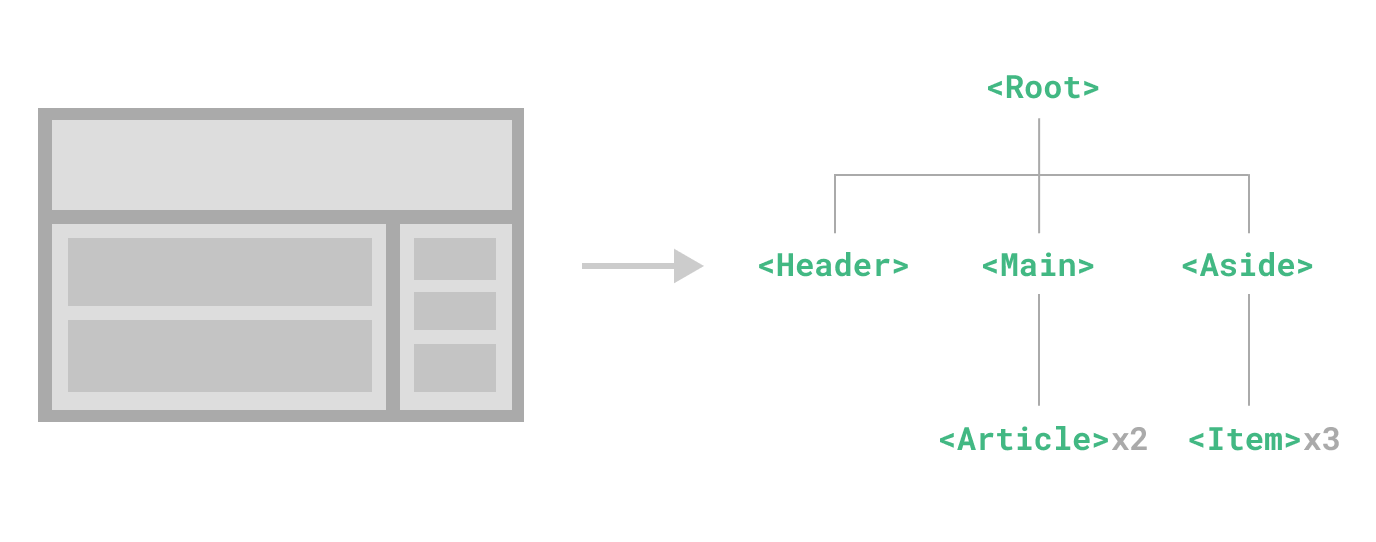
在上面的文章中,"Article"被重复使用了两次,而"Item"则被重复使用了 3 次。这些都是相同样式的列表数据卡片,只是数据不同。对于这种情况,将其抽象为一个通用的组件,优势非常明显。
定义组件
创建一个Acomponent.vue文件
<script setup>
export default {
  name: "Acomponent" // 组件名称
}
</script>

<template>
  <div>sanmu</div>
</template>
上面的代码标识我们导出一个组件名为Acomponent的组件,这个组件显示一个 samu 的文本
引入组件
我们在 App.vue 文件中使用了这个组件。
<script setup>
import Acomponent from './Acomponent.vue'
</script>

<template>
  <Acomponent />
  <Acomponent />
  <Acomponent />
</template>
通过 import 引入 Acomponent 组件,然后我们可以在 template 中使用 <Acomponent></Acomponent> 标签的形式呈现。
从上面可以看到我们多次使用了 Acomponent。
组件通信
一、props / $emit
父组件向子组件传值
我们可以通过 props 参数将数据从父组件传递到子组件。例如,我们可以为 Acomponent 增加一个 props 参数 text,并将其值设置为 sanmu。
<script>
  export default {
    name: 'Acomponent', // 组件名称
    props: {
      text: String, // 接收 props 参数 text,类型为字符串
    },
  };
</script>

<template>
  <div>{{ text }}</div>
</template>
在 App.vue 文件中使用这个组件,并传递 text 参数。
<script>
  import Acomponent from './components/Acomponent.vue';
</script>

<template>
  <Acomponent text="sanmu" />
  <Acomponent text="samu" />
  <Acomponent text="sumu" />
</template>
通过 props 参数,我们可以将相同的组件用于多个类似但不完全相同的情况,并根据需要传递不同的数据。
子组件向父组件传值
子组件通过 $emit 触发父组件的自定义事件,并且可以传递参数。
我们以一个子组件 Bcomponent 为例。这个组件包含一个按钮,点击按钮后,将触发一个自定义事件 myEvent。同时,我们可以通过 $emit 传递一个字符串参数,这个参数将被传递到父组件中。
// 子组件
<script>
  export default {
    name: 'Bcomponent',
    methods: {
      handleClick() {
        this.$emit('myEvent', 'hello world');
      },
    },
  };
</script>

<template>
  <button @click="handleClick">click me</button>
</template>
在父组件中,我们可以监听这个事件,并在事件回调中获取传递的参数。
<script>
  import Bcomponent from './components/Bcomponent.vue';
  export default {
    name: 'App',
    methods: {
      handleMyEvent(data) {
        console.log(data); // 输出 "hello world"
      },
    },
    components: {
      Bcomponent,
    },
  };
</script>

<template>
  <Bcomponent @myEvent="handleMyEvent" />
</template>
通过 $emit,我们可以将子组件中的数据传递到父组件中,从而实现组件之间的通信。
@myEvent 相当于v-on:myEvent
简而言之,父组件定义一个函数 handleMyEvent,并通过 @ 进行绑定,其中的 myEvent 是传递给子组件的函数名,可以理解为父组件的别名。之后,子组件通过触发 this.$emit 来调用父组件的函数。
二、$children / $parent
在 Vue3 中,$children已被移除,官网推荐ref,$parent 仍然可以正常使用。
我们可以使用 $children 和 $parent 访问组件树中的其他组件。其中,$children 包含所有子组件实例的数组,而 $parent 包含当前组件的父组件实例。
例如,我们可以创建一个父组件 ParentComponent,该组件包含两个子组件 ChildComponentA 和 ChildComponentB。在 ParentComponent 中,我们可以通过 $children 访问子组件,并在 mounted 生命周期钩子中将子组件实例存储在 this 对象中。
// ParentComponent.vue
<script>
  import ChildComponentA from './components/ChildComponentA.vue';
  import ChildComponentB from './components/ChildComponentB.vue';

  export default {
    name: 'ParentComponent',
    components: {
      ChildComponentA,
      ChildComponentB,
    },
    mounted() {
      this.childA = this.$children[0];
      this.childB = this.$children[1];
    },
  };
</script>

<template>
  <div>
    <ChildComponentA />
    <ChildComponentB />
  </div>
</template>
在 ChildComponentA 和 ChildComponentB 中,我们可以使用 $parent 访问 ParentComponent 的实例,并通过 this.$parent.childA 和 this.$parent.childB 获取 ParentComponent 中子组件的实例。
// ChildComponentA.vue
<script>
  export default {
    name: 'ChildComponentA',
    mounted() {
      console.log(this.$parent.childB.text);
    },
  };
</script>

<template>
  <div>A组件</div>
</template>
// ChildComponentB.vue
<script>
  export default {
    name: 'ChildComponentB',
    data() {
      return {
        text: 'child B Text',
      };
    },
  };
</script>

<template>
  <div>B组件</div>
</template>
在 ChildComponentA 中,我们将 ParentComponent 中的 ChildComponentB 实例的 text 属性输出到控制台。
通过 $children 和 $parent,我们可以在组件树中访问其他组件实例,从而实现组件之间的通信。
注:在
#app上拿$parent得到的是new Vue()的实例,在该实例上再拿$parent得到的是undefined,而在最底层的子组件拿 $children 是个空数组。还要注意得到$parent和$children的值不一样,$children的值是数组,而$parent是个对象。
三、provide / inject
provide 和 inject 在组件树中提供了一种新的数据传递方式。使用 provide 可以在父组件中定义一个数据或方法,并通过 inject 将其注入到子组件中。
在父组件中,我们可以使用 provide 定义一个数据或方法,并将其传递给子组件。例如:
<script>
  export default {
    provide: {
      name: 'Parent',
      age: 30,
      sayHi() {
        console.log('Hi!');
      },
    },
  };
</script>

<template>
  <div>
    <ChildComponent />
  </div>
</template>
在子组件中,我们可以使用 inject 定义一个对象,并将其指定为 provide 中定义的数据。例如:
<script>
  export default {
    inject: ['name', 'age', 'sayHi'],
    created() {
      console.log(this.name); // 输出 "Parent"
      console.log(this.age); // 输出 "30"
      this.sayHi(); // 输出 "Hi!"
    },
  };
</script>

<template>
  <div>
    <p>{{ name }}</p>
    <p>{{ age }}</p>
  </div>
</template>
在子组件中,我们可以通过 inject 将 provide 中定义的数据注入到子组件中。这样,我们就可以在子组件中访问父组件中的数据和方法了。
需要注意的是,provide 和 inject 不是响应式的。这意味着,如果在父组件中更改了 provide 中的数据,子组件不会自动更新。
如果想进行更改,请使用提供的更改函数,详情https://cn.vuejs.org/guide/components/provide-inject.html#working-with-reactivity。
四、ref
ref 用于在组件或 DOM 元素上添加一个标识,可以通过这个标识访问到组件或 DOM 元素的实例或属性。
我们可以使用 ref 将组件或 DOM 元素的实例或属性绑定到一个变量上,并在需要的时候使用这个变量来访问组件或 DOM 元素。
例如,在一个组件中,我们可以为一个按钮添加一个 ref 属性,并将其绑定到一个变量上。之后,我们就可以在组件的 JavaScript 代码中使用这个变量来访问按钮的实例或属性。
// 子组件
<script>
  export default {
    data() {
      return {
        name: 'ChildComponent',
      };
    },
    methods: {
      sayHello() {
        console.log('hello world');
      },
    },
  };
</script>
上面的代码,我们定义一个子组件,并且定义了一个sayHello方法
// 父组件
<template>
  <ChildComponent ref="child" />
</template>
<script>
  export default {
    mounted() {
      const child = this.$refs.child;
      console.log(child.name);
      child.sayHello(); // hello world
    },
  };
</script>
在父组件引入ChildComponent后,我们可以使用ref属性将其绑定到一个名为child的变量上。之后,可以通过this.$refs.child获取该组件,并调用其下的sayHello方法。
五、$attrs
inheritAttrs是一个布尔类型的选项,用于控制是否将组件根元素的特性应用于模板中的非根元素。
当inheritAttrs为false时,组件根元素的特性将不会应用于模板中的非根元素。
默认情况下,inheritAttrs为true。这意味着组件根元素的所有特性都会自动应用于模板中的非根元素。
如下,我们定一个子组件MyButton
<button>click me</button>
然后在父组件引用它,并且不设置inheritAttrs,那么他的默认值就是 true
<MyButton class="large" :text="text" /> data() { text: '提交' }
当我们渲染到页面上之后,结果是
<button class="large">click me</button>
若我们将MyButton改成
<template>
  <button>click me</button>
</template>

<script>
export default {
  inheritAttrs: false,
};
</script>

<style lang="less" scoped></style>
则渲染的dom结果如下,class 就没有绑定在上面了
<button>click me</button>
针对上述代码,还存在一个问题:如何通过 $attrs 获取 :title 的值。
在 MyButton 中,我们可以添加以下代码:
mounted() { console.log(this.$attrs); }
则会输出,{class: 'large', text: '提交'}
另外,通过 v-bind 指令,我们可以将 attrs 进行透传。
例如,我们定义了一个孙组件,将 MyButton 里面的按钮文案通过下面的组件来显示。
// TextComponent.vue
<template>{{ this.$attrs.text }}</template>

<script>
  export default {
    inheritAttrs: false,
    mounted() {
      console.log(this.$attrs);
    },
  };
</script>
我们使用上面的 MyButton 去引用
// MyButton.vue
<template>
  <button><TextComponent v-bind="$attrs" /></button>
</template>

<script>
  import TextComponent from './TextComponent.vue';
  export default {
    components: {
      TextComponent,
    },
  };
</script>
可以看到,我们在 App.vue 中传递的 text 参数能够在 TextComponent 中正常显示。
<MyButton class="large" :text="text" />
text从 App.vue 传递给 MyButton 在传递给 TextComponent。
除了上述的通信方式,还可以通过 vuex/pinia 和缓存 localStorage 来实现。